How to Set up a Dutch Bucket Growing System
If you're looking for an easy and efficient way to grow your own plants, a Dutch Bucket growing system is a great choice. This method of hydroponic growing has been used for centuries, and offers numerous advantages over other types of hydroponic systems. A Dutch Bucket is a simple and cost-effective setup that can be used to grow virtually any type of plant. In this blog post, we'll explore how to set up a Dutch Bucket growing system and the benefits it offers.
What is a Dutch Bucket?
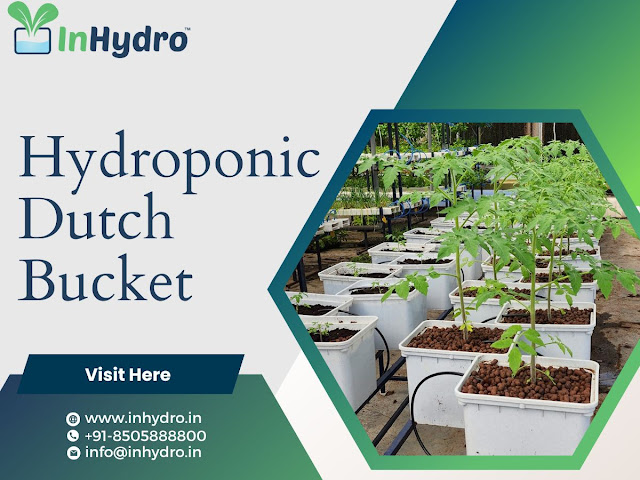
A Dutch Bucket, also known as a Hydroponic Grow Bucket, is an efficient and simple hydroponic system for growing plants. This type of system allows for a wide variety of plants to be grown in a limited amount of space. Dutch Buckets are easy to assemble and maintain, making them a great choice for beginner gardeners or those with limited space.
The Hydroponic Dutch Bucket system utilizes buckets to hold the plants and their roots. The buckets are filled with growing medium such as perlite or coco coir, and then nutrient solution is pumped into the buckets to feed the plants. Water is constantly circulated throughout the system, providing oxygen to the roots and keeping them healthy. With a good lighting system, this system can provide plants with all of the necessary conditions to thrive.
Materials Needed
When it comes to setting up a hydroponic Dutch bucket system, there are several materials that you will need. First, you'll need your Hydroponic Dutch Buckets. These buckets come in various sizes, but most hold 8-10 gallons of water. They have a hole drilled into the bottom for drainage and have a built-in pipe fitting. Second, you will need a nutrient solution. You can make your own or buy pre-made nutrient solutions. Third, you will need some type of net pot or basket to hold your plants in the buckets. Finally, you will need an air pump, air stones, and tubing to provide aeration to your hydroponic grow buckets. With all of these materials, you will be able to set up and maintain a hydroponic Dutch bucket system for your plants.
Step by Step Instructions
Setting up a Dutch Bucket growing system is a simple process that will allow you to produce lush, healthy plants in no time. Here are the steps you’ll need to take to get your system up and running:
1. Select the appropriate container for your hydroponic grow bucket. The Dutch Bucket style of growing works best with large, round containers that have enough space for multiple buckets and a reservoir beneath them. Make sure you select a container that’s large enough to accommodate all of your buckets and can hold enough water for each one.
2. Prepare the buckets for planting. Before you start planting, you’ll need to make sure the buckets are ready for use. Wash the buckets and make sure they are free of any debris or contaminants. Once they are clean, place them inside the container and secure them with a lid if necessary.
3. Install your irrigation system. A Dutch Bucket system requires a reliable irrigation system in order to keep the buckets filled with water and nutrients. Depending on the size of your system, this could be done by hand or through an automated system like a timer or drip irrigation.
4. Fill the buckets with a nutrient solution. The next step is to fill the buckets with a nutrient solution designed specifically for hydroponic growing. Be sure to follow the manufacturer’s instructions when mixing the solution to ensure it is properly balanced for your plants’ needs.
5. Plant your plants in the buckets. Once the buckets are filled with nutrient solution, it’s time to plant! Place the roots of your plants directly into the bucket and secure them with an elastic band or other means. Make sure there is enough space between the plants to ensure they all have adequate access to light and nutrients.
6. Monitor your system. The final step is to monitor your Dutch Bucket system regularly to ensure everything is working properly and that the plants are receiving the nutrients they need. Adjust your irrigation system as needed and keep an eye out for signs of disease or pest infestations.
By following these steps, you can easily set up a Dutch Bucket system and begin enjoying the fruits of your labor in no time.
Maintaining Your System
Once your Dutch Bucket system is up and running, there are several steps you must take to ensure that it remains in good condition. Proper maintenance will keep your plants healthy, productive, and free from pests and diseases.
First, you need to monitor your plants regularly for any signs of disease or pest infestation. Check for discolored leaves, wilted stems, stunted growth, or yellowing leaves. If you spot any signs of pests or disease, treat your plants as soon as possible.
Second, it is important to keep the water levels in your Dutch Buckets topped up. You should check the water level every few days and add more if needed.
Third, it is important to ensure that the pH level of your Dutch Bucket system stays within the recommended range for your particular crop. Test the pH level of your water with a reliable pH meter, and use an appropriate adjustment solution to correct any discrepancies.
Finally, regular fertilization is essential for a healthy Dutch Bucket system. Add a nutrient-rich liquid fertilizer at least once a month and top up with an additional dose of nutrients whenever needed. Be sure to check the instructions on the product packaging for more information about how much and how often to fertilize your Dutch Bucket plants.
By following these simple maintenance steps, you can keep your Dutch Bucket system healthy and productive for years to come.


Comments
Post a Comment